Oh my god you guys it's like.... Almost done???? The sink and a step is basically all that's left! But I'm getting ahead of myself. It was a fulllllllll weekend of work in the trailer but DAMN Y'ALL ITS LOOKING GOOD!
 |
| Cutting paneling for the gooseneck. The windows went wayyyy easier than we thought because I kept all the old window hardware and we could use it as a stencil - packrat tendencies ftw lol |
 |
| I wanted a cute teal microwave but they were $70, and someone gave me this for free. It was sort of ugly, so I painted it. I figured it couldn't get any uglier 🤣 |
 |
| Voila! Perfect fit. |
 |
| Those little between panel trim pieces are THE ACTUAL WORST ugh. Thankfully we didn't have too many! |
 |
| It was an extra good thing I saved the old window hardware because we ended up using them to trim out the panels and make things look more finished |
 |
| This piece of paneling is hidden by the appliances but DH still tried to get it to match up. Close 🤣 |
 |
| I did not make this one line up - oops! |
 |
| My original gray spray paint was gummed up so I found this from the tack shed reno - it's "hammered" so sort of textured? Dunno, it's better than the color it was before haha |
 |
| Vent for the a/c |
 |
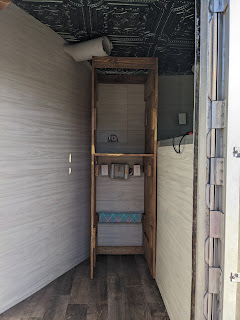
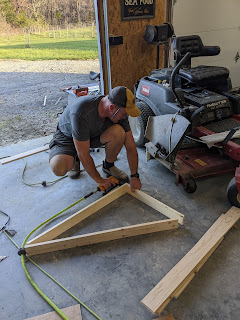
| Building the appliance cabinet |
 |
| I wasn't really seeing his "vision" but as always I just trust the process and it usually works out haha |
 |
| It was starting to make a little more sense by this point |
 |
| There we go |
 |
| It looked better before we wrestled it in and out of the cabinet 6 times and dinged up the finish 🤣 oh well. Free is free. |
 |
| I bought this fabric at least A DECADE ago and used little clips to make makeshift coolers out of it at the barn I used to board at. I repurposed some for this project...... |
 |
| I stained the cabinet Saturday night so it could dry and be installed Sunday. I HATE STAINING. |
 |
| A perfect fit! (Should have bought a Powerball ticket lol) |
 |
| Bolting it into the wall (and floor) so nothing falls during transport |
 |
| DH realizing after we got it all bolted in that he forgot to cut a hole for the a/c cord 🤣🤣 |
 |
| Those boards are wrapped in the fleece and slide in and out of little holders to keep all the appliances stable in transport but still easy to access when we're parked! |
 |
| More fucking staining 🫠🫠🫠 |
 |
| Man this was a good feeling!!! |
 |
| Next project was the corner sink |
 |
| We had to run to town for supplies and I found this clearance bed set that perfectly matches the colors in that fleece, so I changed my design colors mid project 🤣🤣 (originally I was going to use a bedset someone gave me for free that was a smidge darker blue) |
 |
| Starting to look finished! |
 |
| Door trim was stained to match the cabinet |
 |
| But I opted for white trim in the nose (mostly because I was fucking tired of staining) |
 |
| Curtain rods installed (curtains on the way!) |
 |
| This poor bed in a box finally got to unroll. It's the same brand as our spare bedroom bed (that gets rave reviews), but it's like half the depth - mostly because I only have 36" up there and didn't want it to be 1/3 bed! We'll see how that goes. |
 |
| Framing out the sink cabinet |
 |
| Slapped a piece of paneling on the right side, the left side will have a cedar door, and the top will be cedar (with a vessel sink). Water will be two of those five gallon jugs (one for fresh water, one for grey water) and a rechargeable faucet. |
Whew! It was one of those weekends I didn't mind going back to work because it was easier than my weekend 🤣 the remaining supplies are being shipped as we speak so DH might slap the sink together this weekend, we'll see. I also need to figure out the step situation, some small cabinets to hold supplies, and I want to hang some rods on the left side of the appliance cabinet so I can tuck clothes in there like a tiny makeshift closet.... But it's almost road ready!


I'm so impressed! It looks great! Looking forward to seeing the sink all done because I can't quite visualize it.
ReplyDeleteIt all makes sense in my (and thankfully DH's) head, so hopefully it works out!
DeleteI love it!!!
ReplyDeleteI'm pretty tickled!
Delete